Before you can assign a Semi-SKU to a manufacturing process, it must exist in your product catalog with appropriate settings and warehouse assignments. A Semi-SKU behaves like any other SKU in terms of tracking and inventory but is used internally as a production component—not as a final customer-facing product.
1. Get to the Inventory List screen
- Go to Inventory > Product Management.

- From the Inventory List screen, click Add.

2. Create the Semi-SKU
-
This will take you to the Inventory Management screen in Add Mode. Enter your SKU for this item.
Caution: There are certain characters that will not be accepted in a SKU:
? | % | , | & | = | ' | " | \ | leading space | multiple continuous spaces
Best practice is to only use letters and numbers in SKUs. However, there are some characters that you can use.
Characters that will be accepted:
- | _ | $ | # | @ | !
-
Choose the SemiProduct option from the Inventory Type dropdown list.
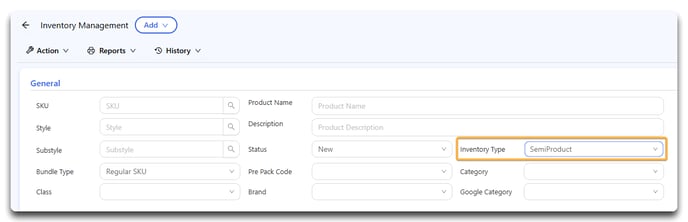
Note: You'll see that under Product Control, Unsellable has automatically been turned "on."

Here's an example:
-
SKU Code: Enter a unique code (e.g., RING-BASE-001)
-
Name: Describe the component clearly (e.g., “Ring Mold - Base Only”)
-
Under Other Settings, assign a Default WHSE (warehouse) #.

3. Save the Semi-SKU
- When you're done, click Save.

- Click Yes.

Where It’s Used
Once created, the Semi-SKU can be used in:
-
BOM Processes: As an output of in-house or outsourced steps
-
WIP Jobs: It will be included in tracking for raw materials and intermediate progress
-
Inventory Reports: To monitor stock of semi-finished components
Related Guides