Accurate cost information is essential for inventory valuation, margin tracking, and reporting. DigitBridge provides multiple ways to enter or update the cost of your products depending on your workflow.
This guide covers three methods:
Cost Management Page
The Cost Management page is designed for bulk editing and reviewing product cost information.
Use this method when:
-
You need to enter or update cost for multiple SKUs
-
You want to review cost history or compare values across warehouses
1. Access the Cost Management Tool
- In ERP, go to Inventory > Cost Management.

2. Search for the SKUs You Want to Update.
- Use the Search by dropdown to select a filter (e.g., SKU, Product Name), enter your search term, and click Apply.

3. Export Existing Data to Excel
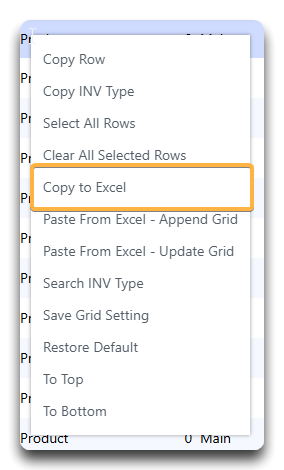
- Right-click anywhere in the grid and select Copy to Excel.
- Paste the data into Excel or Google Sheets.
4. Update Base Costs in Excel
- Find the Base Cost column and edit values as needed. Make sure that you have a SKU and WHSE # (warehouse) as well.
![]()
Tip: Check out this guide for more information on how to paste data from a spreadsheet into DigitBridge.
Note: The only required fields are SKU and WHSE #. You can update any of the other columns you'd like: Base Cost, Tax Rate, $ HDLG (Handling), etc.
Warning: If any of the columns have a leading $, the paste feature will not work.
Warning: The system is case-sensitive. BASE COST will not work - it must be Base Cost.
5. Paste Updated Rows Back into DigitBridge
- Copy the rows you updated in Excel.

- Return to the Cost Management screen, right-click in the grid, and choose Paste From Excel – Append Grid.

6. Save Your Changes
- Review your updates in the Base Cost column.
- Click Save in the top-right corner to apply your changes.

- Click Yes.

Individual Product Page
Cost can also be set directly from the Product Detail page.
Use this method when:
-
You’re working with a single SKU
-
You want to control cost at the item level during setup or edits
1. Search for the SKU You Want to Update
- Use the Search by dropdown and filters (e.g., Product Name or SKU) or More Filters to find your SKU, then click Apply to load results.

2. Open the Inventory Management Screen
- Click the SKU name to open the detailed view of the item.

3. Navigate the Inventory Management Screen
- Click the Edit dropdown at the top to make the page editable.
- Scroll down and click the Inventory tab to view warehouse-level inventory and cost information.
- At the bottom-right of the Inventory section, click the Update Cost button to open the editable cost modal.

4. Enter the Cost Values
- Fill in relevant fields:
-
Base Cost (required)
-
Avg Cost
-
Value Cost
-
Tax Rate
-
Shipping Amount
-
Handling Amount
-
Note: Unit Cost will update automatically based on your inputs.

5. Save the Changes
- Click Save to confirm. A green banner will appear with the message Successfully Updated Cost.

Note: You do not need to click Save in the upper-right of the Inventory Management screen. Clicking Save in the Update Cost window will suffice.
P/O Receive Entry
Cost is often entered at the time of receiving inventory via a purchase order.
Use this method when:
-
You’re recording a live purchase receipt
-
Cost varies from order to order or vendor to vendor
1. Navigate to the P/O Receive Module
- In ERP, go to Purchasing > P/O Receive.

2. Locate the P/O Receive Entry
- Use the Search by dropdown to filter by Receive #, P/O #, or another identifier (or use More Filters), then click Apply to load the relevant entry.

3. Open the Record
- Click the Receive # link to open the entry. In the P/O Receive Management screen, click the Edit dropdown to enable changes.
4. Edit the Record
- Enter Shipping, Handling, and Duty Costs
- In the General section, input any relevant Shipping Amount, Handling Amount, or Duty Amount if applicable. These will contribute to your unit cost allocation.
- Enter Unit Prices for Received Items
- In the Transaction Items section, locate the Price field and enter the unit price for each item received. This price updates the system’s cost record for each SKU.
- *Optional: Use A/P Options for Cost Allocation (see note below)
6. Save Your Updates
- Click Save in the upper right to confirm your entries.

- Click Yes.

*Note: To allocate shared landed costs (e.g., freight, duty, or handling) across SKUs, click A/P Options. This will be covered in detail in this guide.
Tip: Using consistent costing practices across your organization will improve inventory valuation accuracy and reduce accounting discrepancies.
See related:
What’s the difference between the price on a Purchase Order and a Purchase Order Receive?